
Have you ever wondered why your brakes feel less responsive than they used to? Are those squealing sounds during your morning commute starting to worry you? What if I told you that a simple can of brake cleaner could be the difference between a safe journey and a potentially dangerous situation?
Your vehicle's braking system is arguably its most critical safety feature, yet it's often the most neglected when it comes to regular maintenance. Whether you're cruising down the Pacific Highway or navigating Melbourne's busy streets, having brakes that perform at their peak is absolutely vital for your safety and that of everyone around you.
This comprehensive guide will walk you through everything you need to know about brake cleaner for sale, from understanding the science behind these powerful degreasers to choosing the perfect product for your specific needs. We'll explore the top options available at your local Supercheap Auto and Repco stores, share expert tips on safe application techniques, and help you save money whilst maintaining your vehicle's stopping power. By the end of this article, you'll have all the knowledge needed to keep your brakes in tip-top condition, guaranteeing safer journeys for years to come.
What Is Brake Cleaner and How Does It Work?
Brake cleaner is essentially a powerful degreasing solution specifically formulated to remove oil, grease, brake fluid, and other contaminants from your vehicle's braking components. Think of it as a specialised shower gel for your brakes – it strips away all the grime that accumulates over time without leaving any residue behind.
The magic happens through a combination of fast-evaporating solvents that dissolve stubborn deposits whilst carrying them away from critical brake surfaces. When you spray brake cleaner onto dirty components, it immediately begins breaking down the molecular bonds in grease and oil, transforming them into a liquid that simply drips away.
What's particularly brilliant about modern brake cleaners is their ability to evaporate completely, leaving absolutely no film or residue that could compromise your braking performance. This quick-drying characteristic means you can get back on the road faster, with the confidence that your brakes are operating at peak efficiency.
Understanding the Science Behind Brake Degreasers
The chemistry behind brake degreasers is fascinatingly straightforward yet incredibly effective. These products typically contain a mixture of petroleum-based solvents, alcohols, and other cleaning agents that work together to dissolve even the most stubborn automotive contaminants.
When applied to brake components, these solvents penetrate deep into the microscopic pores and crevices where dirt and grease love to hide. The molecular structure of these cleaning agents allows them to surround and lift away contaminants, much like how washing-up liquid helps remove grease from your dishes.
The rapid evaporation rate is achieved through the use of volatile organic compounds (VOCs) that transition from liquid to gas at room temperature. This characteristic not only speeds up the cleaning process but also prevents moisture from lingering on metal surfaces, which could otherwise lead to rust and corrosion.
Chlorinated vs Non-Chlorinated: Which Is Right for You?
The debate between chlorinated and non-chlorinated brake cleaners is one that every car enthusiast encounters eventually. Chlorinated cleaners have been the industry standard for decades, offering superior cleaning power and faster evaporation rates. They're particularly effective at removing heavy grease buildup and stubborn contaminants.
However, non-chlorinated options have gained significant popularity in recent years, and for good reason. These eco-friendly alternatives are less harmful to the environment and safer for use around sensitive materials like rubber seals and plastic components. They're also less likely to damage paint if accidentally sprayed on your vehicle's bodywork.
For most DIY mechanics and everyday maintenance tasks, non-chlorinated cleaners provide more than enough cleaning power whilst offering peace of mind regarding environmental impact and material compatibility. Professional workshops might still prefer chlorinated options for heavy-duty applications, but the gap in performance has narrowed considerably with modern formulations.
How to Choose the Right Brake Cleaner for Your Vehicle
Selecting the appropriate brake cleaner isn't a one-size-fits-all decision. Your choice should reflect your specific vehicle type, brake system configuration, and intended use. Start by considering how frequently you'll be using the product and what level of contamination you typically encounter.
For newer vehicles with regular maintenance schedules, a standard non-chlorinated cleaner will likely meet all your needs. However, if you're dealing with an older vehicle or heavy contamination, investing in a more powerful formulation might save time and frustration in the long run.
Consider also where you'll be working – in a well-ventilated garage or outdoors – as this affects which type of cleaner is safest to use. Your budget obviously plays a role too, but don't let price be the only factor; sometimes spending a bit more upfront saves money through improved efficiency and better results.
Matching Cleaner Types to Your Brake System
Different brake systems have varying requirements when it comes to cleaning products. Disc brake systems, the most common type on modern vehicles, are generally compatible with all brake cleaner types. The open design allows easy access for spray application and quick evaporation of cleaning solvents.
Drum brakes, still found on many rear axles, require cleaners with strong penetrating abilities to reach into enclosed spaces. Here, aerosol cleaners with extension tubes prove particularly useful for directing spray into tight spots where contamination accumulates.
Performance brake systems with upgraded components like carbon-ceramic discs or high-temperature pads may benefit from specialised cleaners designed not to leave any residue that could affect their specific friction characteristics. Always consult your brake manufacturer's recommendations if you've upgraded from standard components.
Reading Labels: What to Look For
Understanding product labels is crucial for selecting the right brake cleaner and using it safely. Look first for the active ingredients list, which tells you whether you're dealing with chlorinated or non-chlorinated formulations. This information directly impacts safety precautions and material compatibility.
Pay attention to any warnings about use on specific materials. Some cleaners may damage certain plastics, painted surfaces, or rubber components. Labels also indicate the product's flash point and flammability rating – critical safety information for storage and use.
Don't overlook the manufacturer's recommended applications and any certifications the product holds. Australian Standard compliance, for instance, provides assurance that the product meets local safety and performance requirements. Volume information helps you compare value between different sized containers.
Cost vs Quality: Finding the Sweet Spot
The relationship between price and quality in brake cleaners isn't always linear. Whilst premium products often deliver superior performance, many mid-range options provide excellent results for typical maintenance tasks. The key is matching the product to your actual needs rather than automatically choosing the most expensive option.
Consider the frequency of use when evaluating cost. If you're cleaning brakes monthly, investing in a quality product makes sense. For occasional use, a budget option might suffice. Calculate the cost per application rather than just the upfront price – concentrated formulas that require less product per use can offer better long-term value.
Remember that using an ineffective cleaner often means using more product or spending extra time scrubbing, negating any initial savings. Strike a balance by choosing reputable brands with positive reviews from Australian users who face similar conditions to yours.
Step-by-Step Guide: Using Brake Cleaner Safely and Effectively
Proper technique transforms brake cleaner from a simple aerosol can into a powerful maintenance tool. Success starts with preparation – gathering the right equipment and setting up your workspace correctly makes the entire process smoother and safer.
Before beginning any brake work, make certain your vehicle is securely supported on jack stands and the wheels you're working on are removed. Never rely solely on a jack for support. Allow the brakes to cool completely if you've recently driven, as hot components can cause cleaners to evaporate too quickly or create dangerous fumes.
Organisation is key to efficiency. Lay out your tools, have plenty of clean rags ready, and position a drain pan to catch runoff. This preparation prevents scrambling for supplies mid-job and reduces the risk of contaminating clean surfaces.
Essential Safety Equipment You'll Need
Personal protective equipment isn't optional when working with brake cleaners – it's essential for your health and safety. Safety glasses or goggles protect your eyes from splashback and overspray, which can cause serious irritation or injury. Even a small amount of brake cleaner in your eyes requires immediate medical attention.
Nitrile or chemical-resistant gloves shield your skin from the degreasing effects of brake cleaners, which can cause dryness, irritation, or chemical burns with prolonged exposure. Latex gloves aren't suitable as many brake cleaners can dissolve them. Choose gloves that extend past your wrists for better protection.
Adequate ventilation cannot be overstated in importance. Work outdoors when possible, or guarantee your garage door is open with fans providing cross-ventilation. A respirator mask designed for organic vapours provides additional protection, especially when working in confined spaces or using chlorinated cleaners.
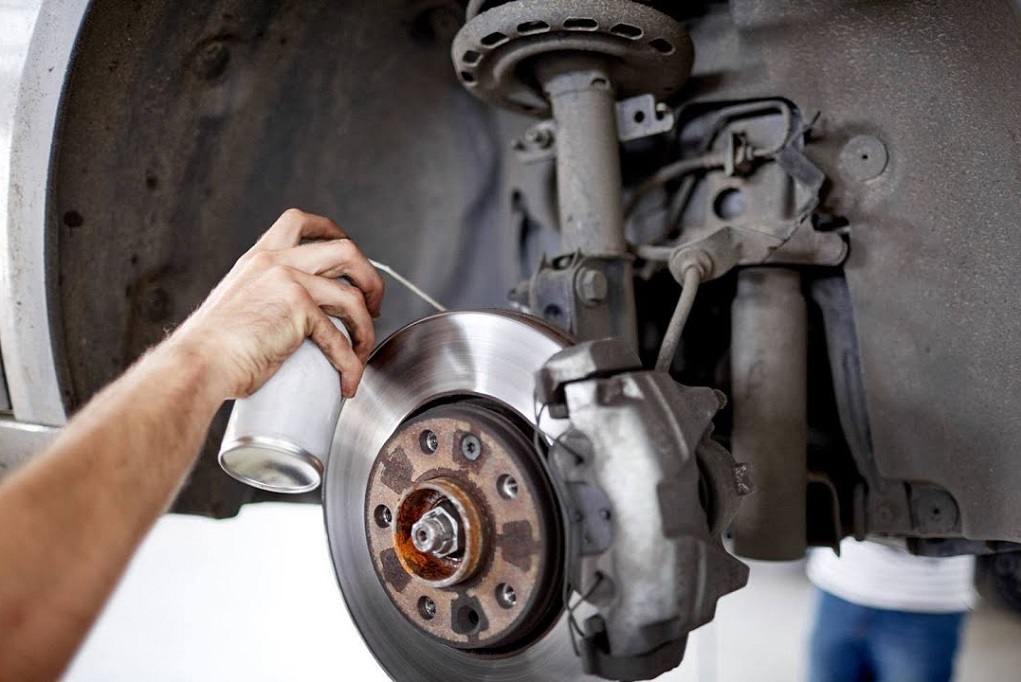
The Proper Application Technique
Start your brake cleaning process by giving the can a good shake to mix the contents properly. Hold the can approximately 15-20 centimetres from the surface you're cleaning. This distance provides optimal cleaning power whilst preventing excessive splashing.
Apply the cleaner in short, controlled bursts rather than continuous spraying. Work from top to bottom, allowing the cleaner to flow downward and carry contamination with it. Pay special attention to crevices and hard-to-reach areas where brake dust and grease accumulate.
After the initial application, allow the cleaner to work for 30-60 seconds before wiping or applying a second coat for stubborn deposits. Use clean, lint-free cloths for wiping, and dispose of them properly once contaminated. For best results, finish with a final spray and allow components to air dry completely before reassembly.
Common Mistakes to Avoid
One of the biggest errors people make is using brake cleaner on hot components. This not only reduces cleaning effectiveness but can create harmful vapours and potentially cause thermal shock to brake parts. Always wait for brakes to cool to ambient temperature before cleaning.
Another frequent mistake is over-application. More isn't always better – excessive brake cleaner can run onto unwanted surfaces, potentially damaging paint, rubber seals, or plastic components. It's also wasteful and increases your exposure to chemical fumes.
Failing to protect surrounding areas ranks high among rookie errors. Brake cleaner can strip paint, damage rubber, and etch certain plastics. Use masking tape and plastic sheeting to protect vulnerable surfaces, and always have clean rags ready to quickly wipe up any overspray or drips.
When Should You Use Brake Cleaner?
Knowing when to reach for the brake cleaner is just as important as knowing how to use it. Regular cleaning prevents the accumulation of contaminants that can compromise braking performance and accelerate wear of expensive components.
Beyond routine maintenance, certain situations demand immediate brake cleaning attention. Understanding these scenarios helps you maintain optimal braking performance and potentially avoid costly repairs down the track.
Creating a maintenance schedule based on your driving conditions and habits makes sure you're neither over-maintaining (wasting time and money) nor under-maintaining (risking safety and premature wear). Let's explore the signs and schedules that'll keep your brakes in peak condition.
Signs Your Brakes Need Cleaning
Squealing or squeaking sounds during braking often indicate contamination on brake surfaces. Whilst some noise is normal, especially in humid conditions, persistent sounds suggest it's time for a thorough cleaning. This is particularly true if the noise appeared suddenly after driving through water or muddy conditions.
Visual inspection reveals telltale signs of needed maintenance. Excessive brake dust buildup on wheels, visible grease or oil on brake components, or a grimy appearance of callipers all signal that cleaning is overdue. Don't wait for multiple symptoms – addressing contamination early prevents more serious issues.
Reduced braking performance or a spongy pedal feel might indicate contamination affecting the friction surfaces. Whilst these symptoms can have multiple causes, starting with a thorough cleaning often resolves the issue and is far less expensive than replacing components prematurely.
Recommended Maintenance Schedule
For typical urban and suburban driving, cleaning your brakes every 6-12 months provides adequate maintenance. This schedule assumes normal driving conditions without excessive exposure to water, mud, or industrial contamination. Increase frequency if you notice heavy brake dust accumulation on your wheels.
Those who frequently drive in harsh conditions – beach areas with salt spray, dusty rural roads, or through water crossings – should clean their brakes every 3-4 months. Off-road enthusiasts might need monthly cleaning during active seasons to prevent contamination from affecting performance.
High-performance driving or track days demand more frequent attention. Clean your brakes after every track session or spirited driving event. The extreme temperatures and heavy use generate more contamination and brake dust, requiring prompt removal to maintain optimal performance.
Emergency Situations That Require Immediate Cleaning
Certain scenarios demand immediate brake cleaning regardless of your regular schedule. If you've driven through deep water or flood conditions, clean your brakes as soon as safely possible. Water can wash away crucial brake lubricants and introduce contaminants that quickly cause corrosion.
Accidental contamination with oil, brake fluid, or other automotive fluids requires urgent attention. These substances severely compromise braking performance and can be dangerous if not addressed immediately. Pull over safely and avoid using the vehicle until you can properly clean the affected components.
After any brake service or component replacement, thorough cleaning removes any fingerprints, grease, or assembly lubricants that might have contaminated friction surfaces. This includes situations where you've handled brake components during other maintenance tasks, as even clean-looking hands can transfer oils that affect braking.
Maintaining Peak Brake Performance for Safer Driving
Throughout this comprehensive guide, we've explored every aspect of brake cleaners, from understanding their chemical composition to mastering proper application techniques. You've learned how to choose between chlorinated and non-chlorinated options, discovered the best products available at your local Supercheap Auto and Repco stores, and gained valuable insights into safe, effective cleaning practices.
Regular brake maintenance using quality cleaners isn't just about keeping your vehicle looking good – it's a crucial safety practice that protects you, your passengers, and everyone sharing Australian roads. By removing contamination that compromises braking performance, you're actively preventing accidents and extending the life of expensive brake components. The small investment in brake cleaner and a few minutes of maintenance time pays dividends in safety and reliability.
Armed with this knowledge, you're now equipped to maintain your vehicle's braking system like a professional. Whether you choose budget-friendly options or invest in premium brake parts cleaners, the key is regular maintenance and proper technique. So next time you hear that tell-tale squeal or notice excessive brake dust on your wheels, you'll know exactly what to do. Here's to safer journeys and the confidence that comes from well-maintained brakes – because when it comes to vehicle safety, there's simply no room for compromise.
0 comments :
Post a Comment
Note: Only a member of this blog may post a comment.